
Start exploring Arduino RGB LEDs with me! Initially, I’m learning how to use Arduino and RGB LEDs to make lights that change colors and create exciting effects. Consequently, I will share my journey through easy tutorials featuring Arduino RGB LEDs. Moreover, you’ll see my progress with straightforward code examples, detailed Arduino sketches, and vivid photos.
LED (Light Emitting Diodes)
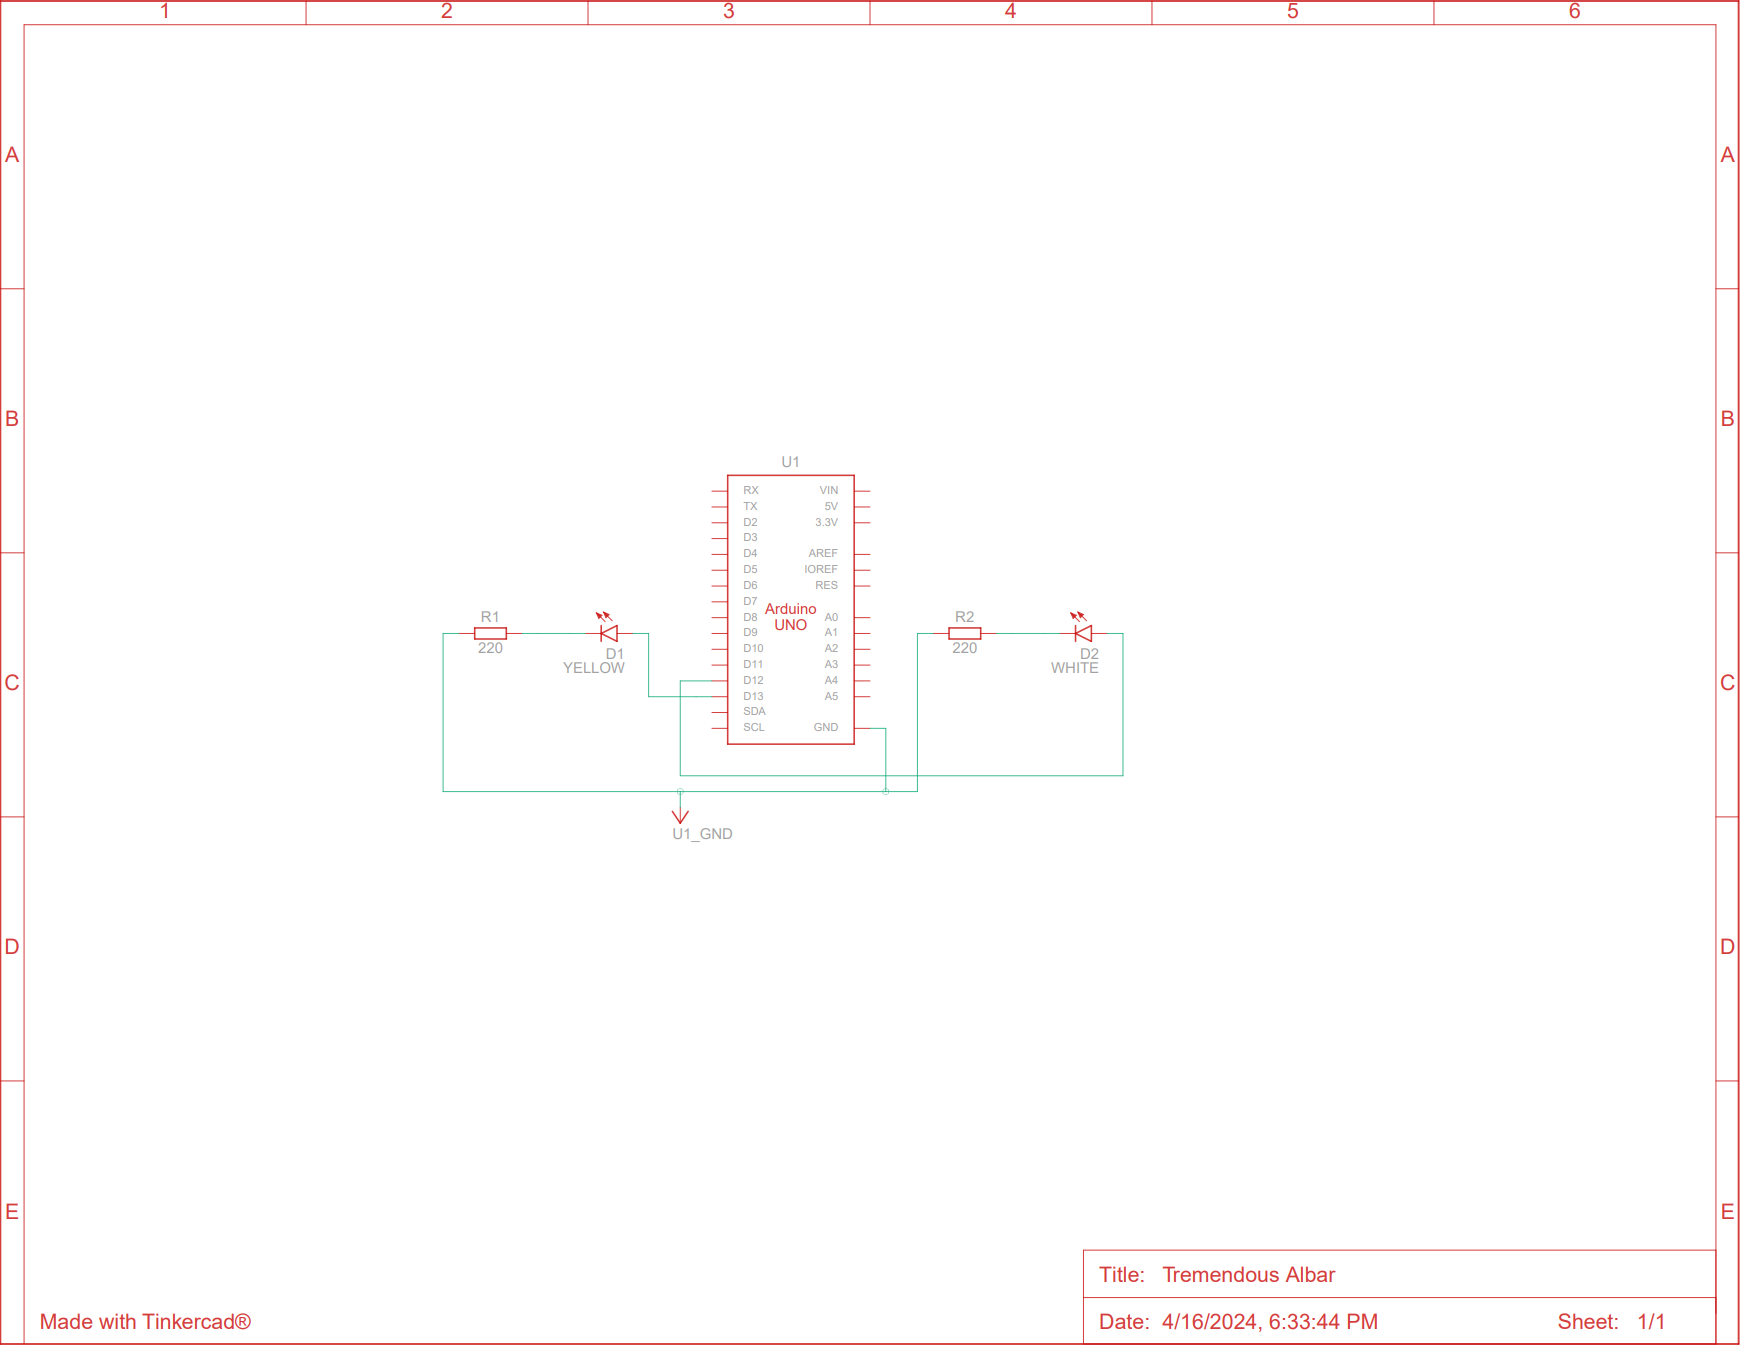
This sketch shows how to make two LEDs—yellow and white—blink alternately. It employs digital pins 13 and 11 for the yellow (LEDY) and white (LEDW) LEDs, respectively. After setting these pins as outputs during the setup phase, the loop continuously alternates these LEDs between on and off states every 500 milliseconds, creating a dynamic flashing effect as the yellow LED lights up while the white LED turns off, and vice versa.
const int LEDY = 13;
const int LEDW = 11;
void setup()
{
  pinMode(LEDY, OUTPUT);
  pinMode(LEDW, OUTPUT);
}
void loop()
{
  digitalWrite(LEDY, HIGH);
  digitalWrite(LEDW, LOW);
  delay(500);
  digitalWrite(LEDY, LOW);
  digitalWrite(LEDW, HIGH);
  delay(500);
}
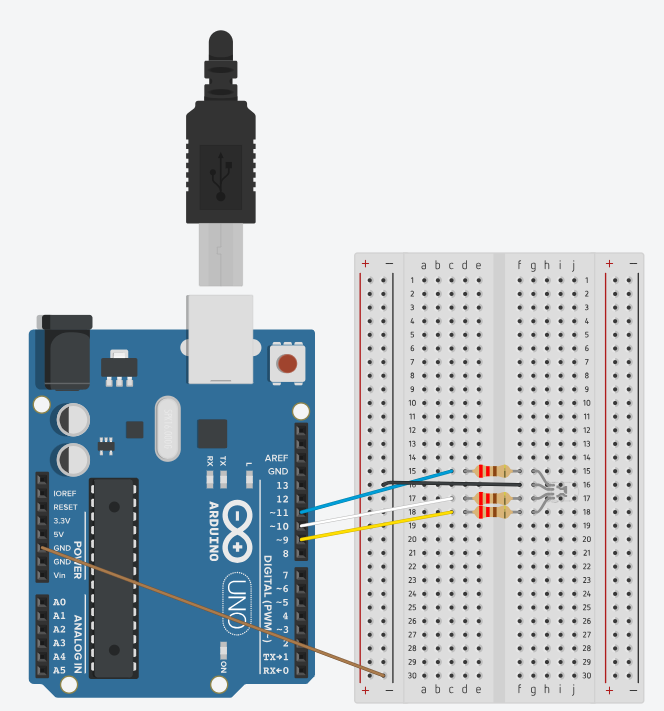
RGB LEDs (Red-Green-Blue Light Emitting Diodes)
RGB LEDs are capable of blending red, green, and blue light at various intensities to generate a multitude of colors.
This particular Arduino sketch focuses on managing an RGB LED to cycle through primary colors, their combinations, and a full color spectrum.
// Pins connected to the red, green, blue LED
const int RED_PIN = 11;
const int GREEN_PIN = 9;
const int BLUE_PIN = 10;
// Display time variable, currently unused
int DISPLAY_TIME = 100;
void setup()
{
  // Set the LED pins as output
  pinMode(RED_PIN, OUTPUT);
  pinMode(GREEN_PIN, OUTPUT);
  pinMode(BLUE_PIN, OUTPUT);
}
void loop() {
// Function to display primary and mixed colors
mainColors();
// Function to display a color spectrum transition
showSpectrum();
}
void mainColors() {
  // Turn all LEDs off initially
  digitalWrite(RED_PIN, LOW);
  digitalWrite(GREEN_PIN, LOW);
  digitalWrite(BLUE_PIN, LOW);
  delay(1000); // Wait for 1 second
  // Red only
  digitalWrite(RED_PIN, HIGH);
  digitalWrite(GREEN_PIN, LOW);
  digitalWrite(BLUE_PIN, LOW);
  delay(1000);
  // Green only
  digitalWrite(RED_PIN, LOW);
  digitalWrite(GREEN_PIN, HIGH);
  digitalWrite(BLUE_PIN, LOW);
  delay(1000);
  // Blue only
  digitalWrite(RED_PIN, LOW);
  digitalWrite(GREEN_PIN, LOW);
  digitalWrite(BLUE_PIN, HIGH);
  delay(1000);
  // Yellow (red + green)
  digitalWrite(RED_PIN, HIGH);
  digitalWrite(GREEN_PIN, HIGH);
  digitalWrite(BLUE_PIN, LOW);
  delay(1000);
  // Cyan (green + blue)
  digitalWrite(RED_PIN, LOW);
  digitalWrite(GREEN_PIN, HIGH);
  digitalWrite(BLUE_PIN, HIGH);
  delay(1000);
  // Magenta (red + blue)
  digitalWrite(RED_PIN, HIGH);
  digitalWrite(GREEN_PIN, LOW);
  digitalWrite(BLUE_PIN, HIGH);
  delay(1000);
  // White (red + green + blue)
  digitalWrite(RED_PIN, HIGH);
  digitalWrite(GREEN_PIN, HIGH);
  digitalWrite(BLUE_PIN, HIGH);
  delay(1000);
}
// Function to transition through a spectrum of colors
void showSpectrum()
{
  int x;
  for (x = 0; x < 768; x++)
  {
    // Compute and show color based on x
    showRGB(x);
    // Delay for smooth transition
    delay(10);
  }
}
// Function to calculate and set RGB intensity
// Color transitions from red to green to blue and back to red
void showRGB(int color)
{
  int redIntensity, greenIntensity, blueIntensity;
// Calculate intensity based on the color wheel position
  if (color <= 255)       // red to green
  {
    redIntensity = 255 - color;
    greenIntensity = color;
    blueIntensity = 0;
  }
  else if (color <= 511)  // green to blue
  {
    redIntensity = 0;
    greenIntensity = 255 - (color - 256);
    blueIntensity = (color - 256);
  }
  else if (color >= 512)  // blue to red
  {
    redIntensity = (color - 512);
    greenIntensity = 0;
    blueIntensity = 255 - (color - 512);
  }
  // Apply the calculated intensities to the LEDs
  analogWrite(RED_PIN, redIntensity);
  analogWrite(BLUE_PIN, blueIntensity);
  analogWrite(GREEN_PIN, greenIntensity);
}
Here’s a detailed description of the code:
- The script begins by defining the pins connected to the red (11), green (9), and blue (10) components of an RGB LED. Subsequently, in the
setup()function, these pins are configured as outputs, enabling control over the LED. - The
mainColors()function. It controls the RGB LED to sequentially illuminate red, green, blue, yellow, cyan, magenta, and white. Each color is displayed for one second, demonstrating how to mix different LED colors by activating multiple LEDs at the same time. - Additionally, the
showSpectrum()function enhances the visual display by looping through color values and adjusting each LED’s intensity. This process ensures smooth transitions between colors. - The
showRGB(int color)function plays a crucial role. It precisely calculates the intensity of each LED based on the provided color value, handling color transitions in three distinct phases: from red to green (0-255), from green to blue (256-511), and from blue back to red (512-767). The calculated intensities are then meticulously applied to the LED pins viaanalogWrite(). - Finally, the
loop()function ensures the display never ends. It continuously callsmainColors()andshowSpectrum(), showcasing the programmed color patterns and transitions without interruption.
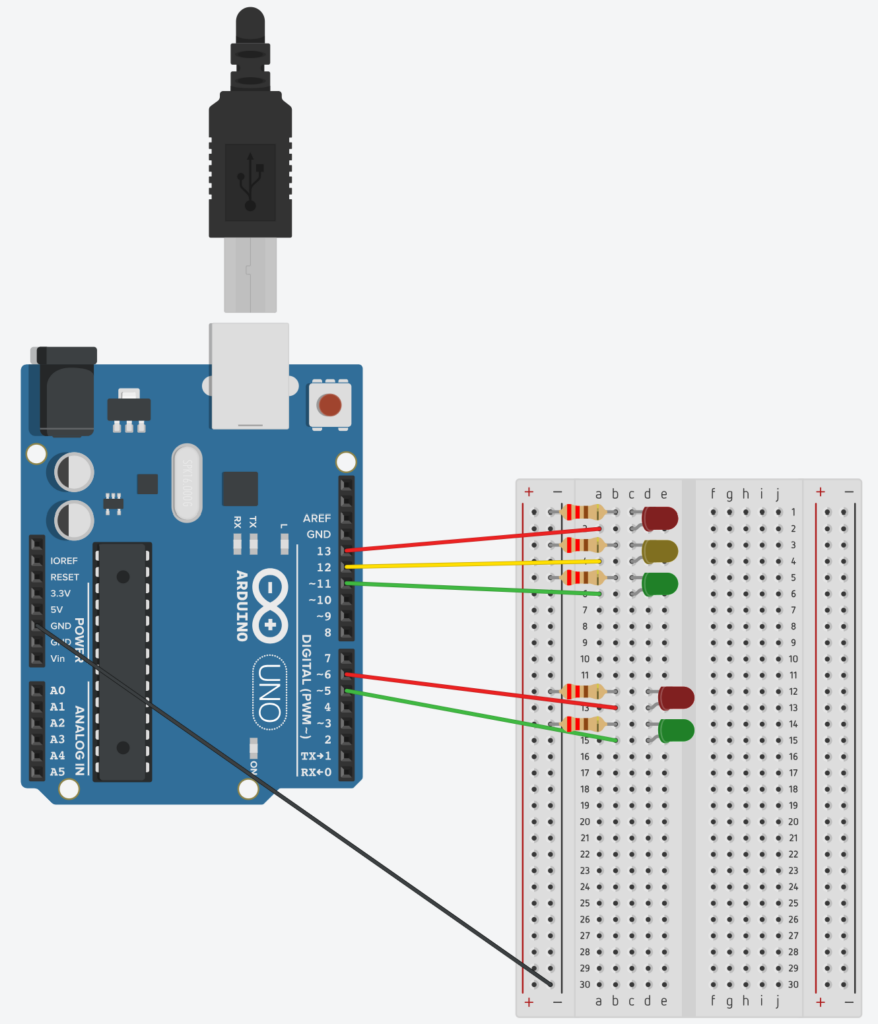
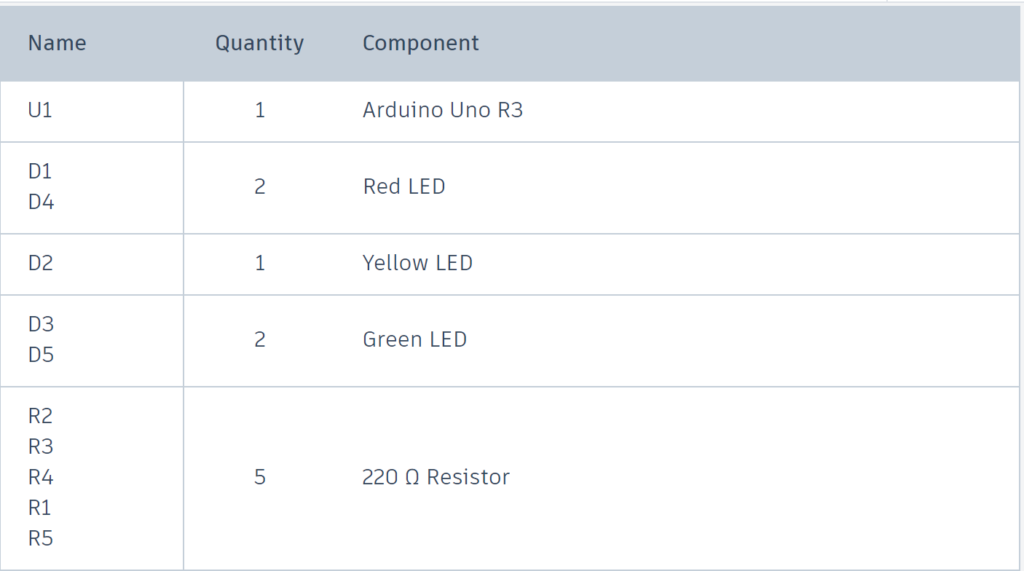
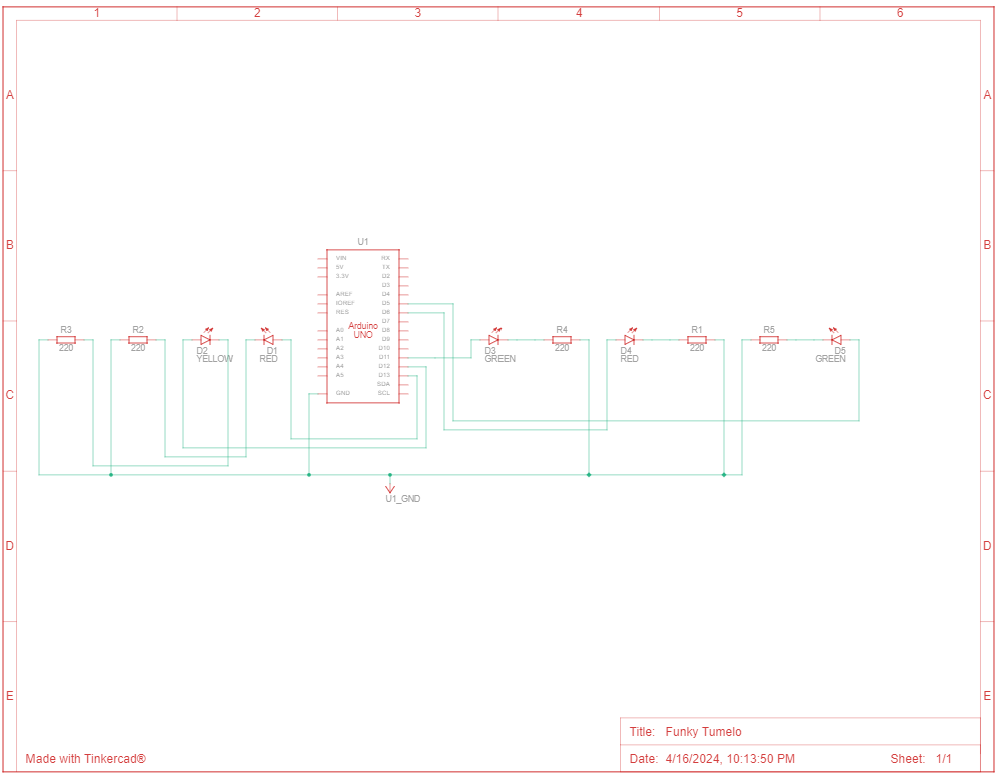
Traffic lights
This segment of an Arduino sketch sets up a traffic light system with both car and pedestrian lights, and it includes a mode for daytime and nighttime operation.
changeTimestampis an unsigned long variable that will hold the timestamp of the last mode change from day to night or vice versa. It is initially set to 0isDayModeis a boolean variable that indicates whether the system is currently in day mode (true) or night mode (false). It is initially set totrue, meaning the system will start in day mode.
const int RED_LED = 13;       // Car red light
const int YELLOW_LED = 12;    // Car yellow light
const int GREEN_LED = 11;     // Car green light
const int PED_RED_LED = 6;    // Pedestrian red light
const int PED_GREEN_LED = 5;  // Pedestrian green light

// 1 minute for example
const long DAY_MODE_DURATION = 60000;
const long NIGHT_MODE_DURATION = 60000;
// Delay for flashing light
const int FLASHING_DELAY = 1000;

unsigned long changeTimestamp = 0;
bool isDayMode = true;
The setup() function in an Arduino sketch is called once when the program starts. It’s used to initialize the digital pins as inputs or outputs, start communication protocols, etc.
void setup() {
  pinMode(RED_LED, OUTPUT);
  pinMode(YELLOW_LED, OUTPUT);
  pinMode(GREEN_LED, OUTPUT);
  pinMode(PED_RED_LED, OUTPUT);
  pinMode(PED_GREEN_LED, OUTPUT);
}
The loop() function is executing over and over again, indefinitely.
- The function starts by capturing the current time since the Arduino started running with
millis(), which returns the number of milliseconds passed. - It then checks if the current mode should be changed. This is based on how much time has passed since the last change (
changeTimestamp). - If it’s day mode (
isDayModeis true) and the time elapsed sincechangeTimestampexceedsDAY_MODE_DURATION, the mode switches to night mode by settingisDayModeto false. It also updateschangeTimestampto the current time. - Conversely, if it’s night mode (
isDayModeis false) and the time sincechangeTimestampis greater thanNIGHT_MODE_DURATION, it switches back to day mode, again updatingchangeTimestamp.
void loop() {
  unsigned long currentTimestamp = millis();
  // if we should change the mode
  if (isDayMode && currentTimestamp - changeTimestamp > DAY_MODE_DURATION) {
    isDayMode = false;
    changeTimestamp = currentTimestamp;
  } else if (!isDayMode && currentTimestamp - changeTimestamp > NIGHT_MODE_DURATION) {
    isDayMode = true;
    changeTimestamp = currentTimestamp;
  }

  if (isDayMode) {
    dayMode();
  } else {
    nightMode();
  }
}
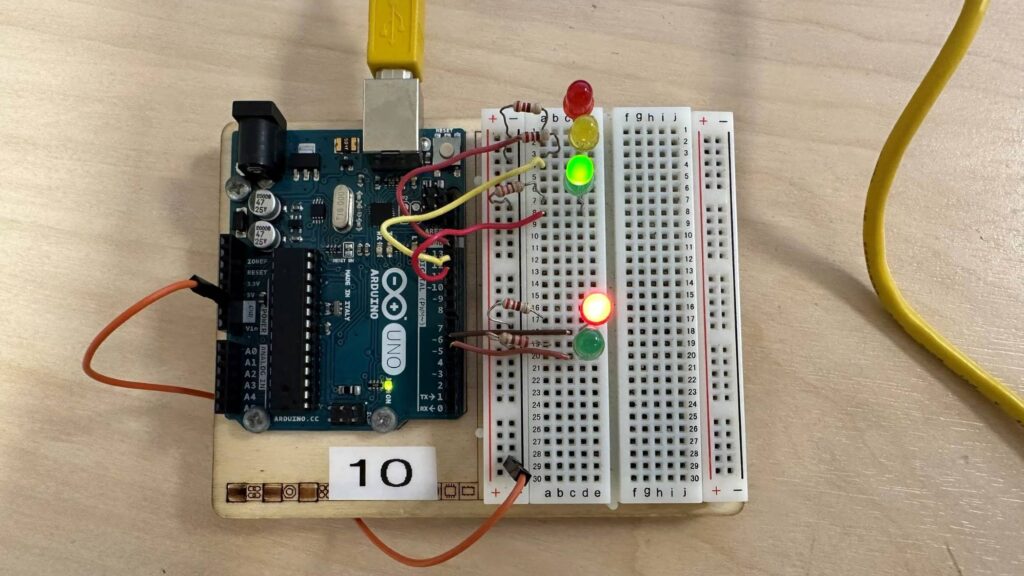
Traffic light sequence for day mode
void dayMode() {
  digitalWrite(GREEN_LED, HIGH);
  digitalWrite(YELLOW_LED, LOW);
  digitalWrite(RED_LED, LOW);

  digitalWrite(PED_GREEN_LED, LOW);
  digitalWrite(PED_RED_LED, HIGH);
  delay(5000);   // Cars - Green, Pedestrians - Red


  digitalWrite(GREEN_LED, LOW);
  digitalWrite(YELLOW_LED, HIGH);
  delay(1000);   // Yellow for 1 second


  digitalWrite(YELLOW_LED, LOW);
  digitalWrite(RED_LED, HIGH);

  digitalWrite(PED_RED_LED, LOW);
  digitalWrite(PED_GREEN_LED, HIGH);
  delay(5000);  // Red and pedestrian green for 5 seconds


  digitalWrite(RED_LED, LOW);
  digitalWrite(YELLOW_LED, HIGH);

  digitalWrite(PED_RED_LED, HIGH);
  digitalWrite(PED_GREEN_LED, LOW);
  delay(1000);  // Pedestrian red and car yellow
}
Night mode traffic light sequence
void nightMode() {

  // All lights off except yellow, which flashes
  digitalWrite(RED_LED, LOW);
  digitalWrite(GREEN_LED, LOW);

  // Pedestrian red is always on
  digitalWrite(PED_GREEN_LED, LOW);
  digitalWrite(PED_RED_LED, HIGH);


  // Flashing yellow light
  digitalWrite(YELLOW_LED, HIGH);
  delay(FLASHING_DELAY);
  digitalWrite(YELLOW_LED, LOW);
  delay(FLASHING_DELAY);
}